Guest speaker Leslie Styler Photography is posting this tutorial.
I learned this cool tutorial recently from a friend photographer and wanted to share it with you. I have a few people asking me to teach them Photoshop so here is real quick and easy tutorial for sharpening eyes. I was planning on teaching an editing class in my home on Photoshop after I get better. In the meantime I thought I could just post a few tutorials on my blog for all those who would like to learn a few tips. Here are the steps are screenshots of my workflow. I hope this helps. Let me know if you have any questions, I will do my best to get back to you when I can to answer any questions you may have about this.
Listen this tutorial is very simple and you can learn it fast. Just do it a couple times and you will have it down pat.
Feel free to leave me a comment if this has helped you or you have learned something from it. I love hearing comments!
I went to college for a Bachelor’s in Computer Animation at The Art Institute of Pittsburgh, PA and The Art Institute of Los Angeles, CA. I had one quarter left to get my BA after 4 years but got asked to work on a feature film The Polar Express doing Motion Capture. From there my career in movies began. My background is in Visual Effects for movies. So I learned a ton of Photoshop and 3D programs. I will try and teach some of my work flow through my blog so that people all over the world can learn instead of just in Arizona.
The following tutorial is from Adobe Photoshop cs3 version 10
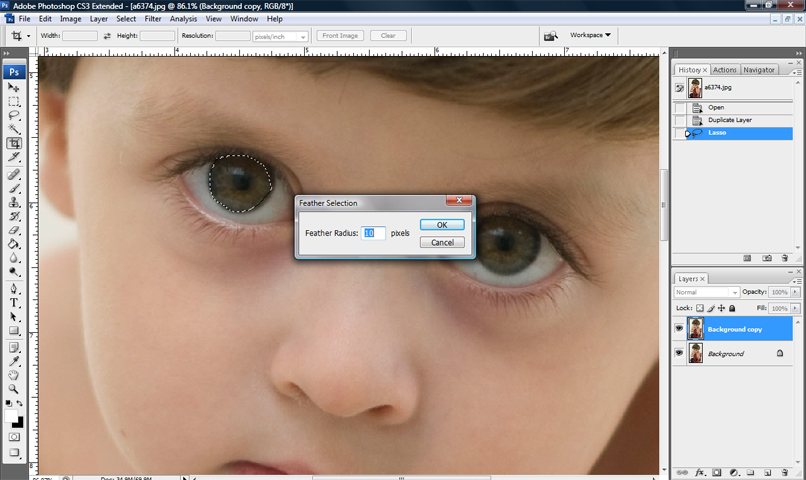
1. zoom into the person’s eyes
2. drag the background layer and duplicate it (drag background to the button create new layer button, left of the garbage can)

3. select the LASSO TOOL (3rd tool from the top, on the left hand side)


4. draw a circle around the color part of the eye with the LASSO TOOL
5. Right click and FEATHER 5-10 pixels is good
6. Go to the SELECT at the top of the screen then select INVERSE, then hold CRTL and X (which deletes everything from the second layer so only the eye is left) OR EDIT, then CUT.
This leaves only the eye left. This is just an example of how it might look if you accidentally pick more than just the eyeball color.


7. Pick the ERASER tool and erase anything around the eye so you only leave the color of the eyeball. Make sure there is no white of the eyeball or skin left.


12. go to FILTER then SHARPEN, then UNSHARP MASK


Repeat and do the same steps for the next eye. The finished product is below


I wrote this years ago this tutorial. What I am going to start doing is adding video tutorials soon. I need to record it at night when my little kiddos aren’t in the background running around making so much noise (as you Mom’s know how that goes). It would be hard to hear me.
Come back!!